Update, April 10th: Use of some of the mateirals processing capabilities – notably Alpha Masking and Emissive Masks – can have a significant affect on Land Impact valuse – see my week 14 SL projects update for details.
On Monday April 8th, Linden Lab released the first public cut of the Materials Processing project viewer. As the server-side of the materials processing support was deployed to the main grid earlier in the year, this release means that materials processing – with some caveats – can be experimented with by all.
These caveats are that the viewer is still very much an alpha release, and as such is both subject to change and should not be relied upon as a primary viewer for everyday use in SL. Also, as elements of the viewer may change before it reaches a release status, it is viewed as advisable by LL that people do not use the materials capabilities on MOD / NO COPY items.
So how does it all work? I provided an introduction to materials processing as it applies to Second Life back in 2012. However, the following will hopefully provide a summary for those who haven’t kept up with the news as well as providing a look at the viewer itself.
What is Materials Processing?
Materials processing is the combining of various computer graphics “maps” to significantly increase the level of detail that appears on any object or surface within a computer game. Within Second Life, textures (themselves a form of computer graphics map called a “diffuse map”) are used to add detail to in-world objects and surfaces. The new materials processing capability will introduce two further kinds of computer graphics map – normal and specular – to Second Life which can be used alongside textures to dramatically increase the detail and realism of objects and surfaces.
- Normal maps are a means of faking high levels of detail on an otherwise bland surface by means of simulating the bumps and dips that create the detail. Normal maps can be created in several ways – such as from a texture (diffuse) map using a suitable graphics application (and plugin, if required), or by producing a high-quality model (mesh) and using an overlay process to generate a normal map which can then be applied to a lower-quality model of the same object (i.e. one with a lower triangle count) to simulate the same level of detail as the high quality model, as shown below.

- In the real world, every highlight we see in an object is actually the reflection of a light source. Surfaces reflect light differently to one another, depending on a range of factors (material, lighting source point(s), etc.). Specular maps simulate this by allowing individual pixels in an object to have different levels of brightness applied to them, giving the appearance of different levels of light being reflected by different points on the object. Like normal maps, specular maps can be produced in a number of ways, both within 3D graphics modelling programs and in tools like PhotoShop.

The new capabilities in Second Life allow diffuse (texture), normal and / or specular maps to be applied to in-world objects (prims, meshes), to achieve a much greater level of realism in their appearance.
First, Create Your Maps
In order to use the new capabilities, you must obviously have the required maps. These ca be created in numerous ways, and I’m certainly not qualified enough to give a hands-on demonstration myself. As such the following are intended merely as possible pointers.
Normal maps can be readily produced directly from an associated diffuse (texture map), which may be the most common way to do so. Both Photoshop and Gimp, for example, support normal map creation in this way, each using a suitable plugin. Photoshop uses the nVidia normal map filter for example, while Gimp uses a plugin of its own. There are numerous tutorials available on YouTube explaining how to create normal maps using either Gimp or Photoshop and these plugins.

As a user of Gimp, I found the following tutorial by vscorpianc provides a sold look at getting going with normal map creation, as it covers installing the required Gimp plug-in and also offers-up various resources for image files to play with, if you don’t have anything suitable yourself.
For those working with mesh, there are also various ways in which to produce a suitable normal map – including, as mentioned above, using an overlay from a high-quality model on an identical model of lower quality. Again, as I don’t use the likes of Blender, Maya, et al, You Tube offers what appears to be some easy-to follow tutorials for those who need them.
The same is true for producing specular maps within various graphics applications as well – such as bond1TGC’s tutorial on Specular Map Creation Tutorial or Aleks Markelj’s detailed tutorial Using Photoshop to create Diffuse/Specular Maps.
Using Your Materials Maps
The first thing to remember is that materials effects will only be visible in Second Life on viewer which are running in deferred mode – that is, they have the Advanced Lighting Model option in the Graphics tab of Preferences checked – although Shadows do not have to be enabled as well.

The Build Floater – Applying Maps
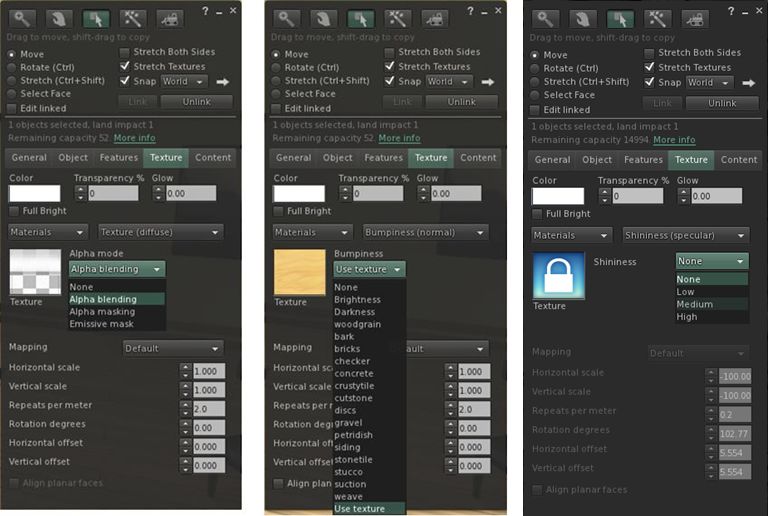
The project viewer for materials processing introduces an updated Texture tab to the build floater, which enables diffuse, normal and specular maps to be applied to in-world objects. Drop-down menus are used to determine whether an object or object face is using materials or media and also to select whether you are working with a diffuse, normal or specular map.
The first drop-down on the tab switches between the Materials option and the Media options for creating media on a prim. Materials is displayed by default, with the map drop-down defaulting to Texture.
All three forms of map are applied in the familiar way – using a picker function. Simply select which type of map you wish to apply from the drop-down menu, pick it from your inventory and apply. You can then set the required repeats, rotation, etc., on per map basis (something which wasn’t originally going to be possible). In addition, each map type has its own specific options:
- Diffuse (texture) maps include an Alpha mode when working with alpha masks, which can be set to one of:
- None – the alpha channel is ignored, rendering the face opaque, or
- Alpha blending – essentially the same as we currently have for any alpha texture, or
- A 1-bit alpha mask with each pixel either 100% transparent or 100% opaque, with a cutoff setting to determine where the threshold is (alpha masks should render faster than alpha blending, and eliminate issues with alpha layer sorting), or
- Emissive mask – so the alpha layer is interpreted as a per-pixel glow setting.
- Normal maps allow you to apply any of the original bump map options built-in to the viewer, rather than applying a custom normal map
- Specular maps allow you to apply the original “shiny” options found in the build floater.
Once you have applied the relevant maps, and providing you are running in deferred mode / Advanced Lighting Model, the impact of the materials processing should be readily apparent.

General Notes
Materials processing is being developed as a co-operative project involving Linden Lab and members of the Catznip, Exodus and Firestorm viewer teams.
Note that while all regions on the main grid are running the most up-to-date version of the server-side materials code, this is not the case with the beta (Aditi) grid, where some regions are liable to be running older versions of the server code, and so the viewer may not function as reliably on Aditi as on the main grid, or may give unexpected results.
The viewer still is in its earlier stages, and Linden Lab have requested that any issues or bugs discovered while using it are reported via JIRA under the MATBUG project title (JIRAs filed under this title are publicly viewable). While the source code for the viewer has also been made available, Oz Linden has suggested TPVs / viewer self-compilers may want to hold-off on merging the code for the time being. Speaking at the Content Creation User Group on Monday April 8th, he noted:
I strongly recommend that no one start integrating this yet until we’ve hammered out more of the bugs. You could waste quite a lot of time. Also, we have not yet pulled Sunshine (server-side appearance) to this branch.
Whether this proves to be the case, or whether we will see alpha and experimental versions of some TPVs appearing sooner rather than later remains to be seen. In the meantime, for those wishing to try-out the new capability, the project viewer awaits!

Great article. I’ll start linking away 😀
LikeLiked by 1 person
With so many new features currently released and being tested on Aditi, I lost track of everything that LL is doing 🙂 Hopefully they are able to integrate everything back into a single viewer hehe…
Thanks for keeping us informed on the fast pace of development of SL. It seems that there is something new every day!
LikeLike
Re-integration will happen, as is the course of things :).
Next up will be the Server-side baking / appearance reaching beta (this already has CHUI integrated into it), as well as starting to appear in TPVs. After that, we should start seeing maintenance releases with things like FMODex & other updates while materials progresses through project, dev and beta towards release.
Hopefully, we’ll also see Aditi return to a par with Agni as further server-side releases are made to the former.
LikeLike
It’s always good to see that the Lab is working to improve things instead of staying idle. And I hope tonight’s deployment will rectify what didn’t exactly work last week.
LikeLike
Laverne Donat posted a nice video on Youtube that displays the capabilities of the materials processing:
LikeLike
Nicely done!
LikeLike
🙂
LikeLike
So far, so good, but there’s something I’m a bit unsure of regarding the materials viewer’s texture tab in the builder floater. The current (i.e. without materials processing) viewer build allows us to choose between four levels of shininess (none, low, medium and high), while the bumpiness menu has a range of options, of which I only use two (brightness and darkness).
When materials processing “comes to town”, how will we be able to determine how shiny a texture will be? And there’s something I’m wondering w.r.t. the differences between normal maps and darkness/brightness-based bumpiness (the latter, I must say, doesn’t always give good or useful results).
LikeLike
Duh – I didn’t read the post as carefully as I should. Please disregard my previous comment.
LikeLike